C/C++ project with vscode, CMake
I. C++ project with VSCode
There are multiple ways of creating C++ project. You could choose to go with heavy lifting IDE(Microsoft Visual Studio, Eclipse, Code::Blocks, CLion,…), or go with plain notepad++, compiler, and a console.
But all of these IDE required you to install additional software on your PC, and the text editor, compiler combo make it hard when it come to debug your program.
Then you may want to start with VsCode, a perfect fit between two options above, simple but has enough extension for your needs, and you can use it for different programming languages.
Let’s start
1. Target system
As mention above, vscode is a code editor with a lot of powerful extensions. But at the core, it’s still a text editor, and to build your C/C++ program, you still need to provide the compiler.
The compiler, where and how to install it.
- Windows
- You can get MS visual studio code compiler cl here, it’s come with IDE though. I think we could install the compiler only, but you have to look around for that option.
- Or you can get MingGW-g++, it’s come along with cgwin(bash like console on window). It’s pretty old but work perfect when you want a linux like environment on window
- Linux or Windows Linux Subsystem
- On a linux machine or WSL, it should come with pre-install gnu-g++, you could test with type
g++ --versionto check. If it’s not installed, thensudo apt install g++should do the job
- On a linux machine or WSL, it should come with pre-install gnu-g++, you could test with type
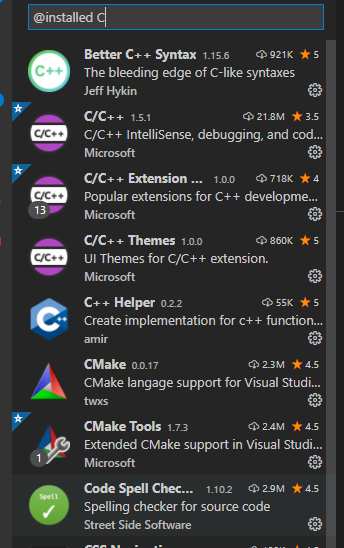
2. VsCode extensions
There is a lot of extensions, which support C/C++ development on vscode. But to keep it simple, we usually go with one below.
3. Let’s build and debug it
Alright, after you get all the extensions and compiler in place, let’s create a simple C++ program and try to build it.
- Create a folder for your project, open vscode then [Ctrl + k + o] to open your project folder.
- Create a main.cpp and input your sample code.
#include <iostream>

int main(int argc, const char* argv[])
{
    std::cout << "ayy" << std::endl;
}- [Ctrl + Shift + p]: type in “C/C++: edit configurations”.
You can choose UI option to show the UI for setting, go through it and change the setting your self, after you finished just [Ctrl + s] the configuration shall be save and store to ./.vscode/c_cpp_properties.json in your project folder
If you chose the JSON, the c_cpp_properties.json shall be open right away for you with default a default config for the available compiler in your environment. Below is sample configurations, 1st for mingw64 g++ compiler and 2nd is for msvc compiler.
{
    "configurations": [
        {
            "name": "Win32_mingw64",
            "includePath": [
                "${workspaceFolder}/**"
            ],
            "defines": [
                "_DEBUG",
                "UNICODE",
                "_UNICODE"
            ],
            "windowsSdkVersion": "10.0.18362.0",
            "compilerPath": "C:/Program Files/mingw-w64/x86_64-8.1.0-posix-seh-rt_v6-rev0/mingw64/bin/g++.exe",
            "intelliSenseMode": "windows-gcc-x64",
            "cStandard": "c17",
            "cppStandard": "c++17"
        },
        {
            "name": "Win32_cl",
            "includePath": [
                "${workspaceFolder}/**"
            ],
            "defines": [
                "_DEBUG",
                "UNICODE",
                "_UNICODE"
            ],
            "windowsSdkVersion": "10.0.18362.0",
            "compilerPath": "C:/Program Files (x86)/Microsoft Visual Studio/2019/Community/VC/Tools/MSVC/14.27.29110/bin/Hostx64/x64/cl.exe",
            "intelliSenseMode": "windows-msvc-x64",
            "cStandard": "c17",
            "cppStandard": "c++17"
        }
    ],
    "version": 4
}
[Ctrl + Shift + p]: “Select configuration” then you can create multiple configuration and switch between them.
[Ctrl + Shift + p]: “Build and Debug Active File”, you can build and debug a simple Cpp program, remember to open your main.cpp first as active file. Red one is default, green is Tasks option, which is created after 1st execute.

Select your target compiler, then your Cpp file will be build and executed. If you want to stop the program, place debug point on the line count ruler in the editor or else it will run to the end right away.
NOTE: To able to use the msvc compiler, vscode has to be lunched from “Developer Command Prompt for VS”. i.e. Start > Developer Command Prompt for VS > cd to project folder >
code .to open vscode
After execute, your vscode shall spawn a new tasks.json file in .vscode folder of project. Below is sample tasks.json file, which is generated when you run with 2 different compiler (msvc and gnu-g++).
{
    "tasks": [
        {
            "type": "cppbuild",
            "label": "mvsc_preruntask",             // Default value is "C/C++: cl.exe build active file", you could change it
            "command": "cl.exe",                    // call the compiler to compile the program
            "args": [                               // input args for the compiler
                "/Zi",
                "/EHsc",
                "/nologo",
                "/Fe:",
                "${fileDirname}\\app.exe",          // "${fileDirname}\\${fileBasenameNoExtension}.exe", output to app.exe file
                "${fileDirname}\\*.cpp"             // "${file}" , change to target build all *.cpp file in current folder
            ],
            "options": {
                "cwd": "${fileDirname}"
            },
            "problemMatcher": [
                "$msCompile"
            ],
            "group": "build",
            "detail": "Task generated by Debugger.",
            "promptOnClose": true
        },
        {
            "type": "cppbuild",
            "label": "g++_preruntask",              // "C/C++: g++.exe build active file"
            "command": "C:/Program Files/mingw-w64/x86_64-8.1.0-posix-seh-rt_v6-rev0/mingw64/bin/g++.exe",
            "args": [
                "-g",
                "${fileDirname}\\*.cpp",            // "${file}"
                "-o",
                "${fileDirname}\\app.exe"           // "${fileDirname}\\${fileBasenameNoExtension}.exe"
            ],
            "options": {
                "cwd": "C:/Program Files/mingw-w64/x86_64-8.1.0-posix-seh-rt_v6-rev0/mingw64/bin"
            },
            "problemMatcher": [
                "$gcc"
            ],
            "group": "build",
            "detail": "Task generated by Debugger.",
            "promptOnClose": true
        }
    ],
    "version": "2.0.0"
}
More on tasks.json setup here!
Basically you can change the tasks to call to external script command to build your project (i.e. make,..). But for now it’s a simple project so let’s just change some of its default value (label, compiler args) so we can refer to it in lunch debug.
[Ctrl + Shift + D] to lunch debug operations, we will refer to those build tasks before proceed with the debugger.
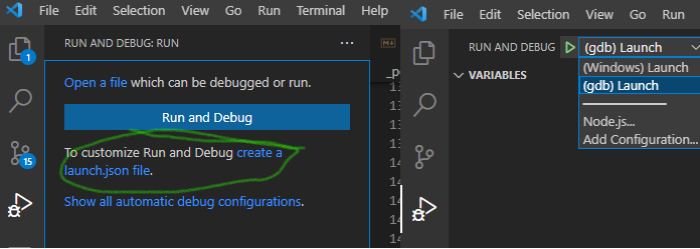
Select the target environment, a lunch.json file will be created in .vscode folder. Change some default value, so lunch operation shall prefer to your preLunchTask. After updates, in debug shall show you the available options.
{
    // Use IntelliSense to learn about possible attributes.
    // Hover to view descriptions of existing attributes.
    // For more information, visit: https://go.microsoft.com/fwlink/?linkid=830387
    "version": "0.2.0",
    "configurations": [
        {
            "preLaunchTask": "mvsc_preruntask",     // label of target task in your tasks.json
            "name": "(Windows) Launch",
            "type": "cppvsdbg",
            "request": "launch",
            "program": "${workspaceFolder}/app.exe", // application name you want to debug
            "args": [],                              // input args for the debug program, in this case is "app.exe"
            "stopAtEntry": true,                     // debug stop at entry of main
            "cwd": "${fileDirname}",
            "environment": [],
            "console": "integratedTerminal"
        },
        {
            "preLaunchTask": "g++_preruntask",
            "name": "(gdb) Launch",
            "type": "cppdbg",
            "request": "launch",
            "program": "${workspaceFolder}/app.exe",
            "args": [],
            "stopAtEntry": true,
            "cwd": "${fileDirname}",
            "environment": [],
            "externalConsole": false,
            "MIMode": "gdb",
            "miDebuggerPath": "C:/Program Files/mingw-w64/x86_64-8.1.0-posix-seh-rt_v6-rev0/mingw64/bin/gdb.exe",
            "setupCommands": [
                {
                    "description": "Enable pretty-printing for gdb",
                    "text": "-enable-pretty-printing",
                    "ignoreFailures": true
                }
            ]
        },
    ]
}
Now open your main.cpp, press F5.
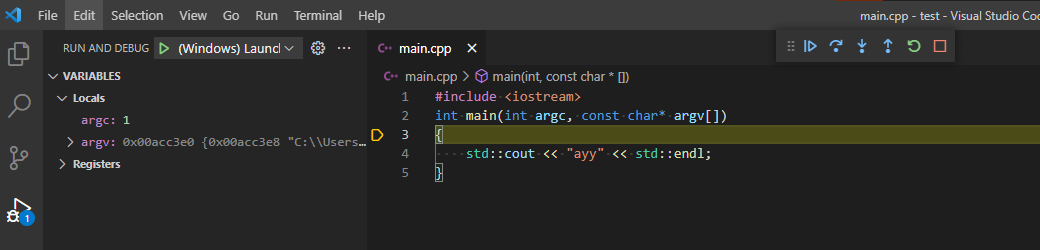
More on lunch.json setting here!
II. (Too bland?) Let’s add CMake flavor
So in first section, we able to setup a simple project to build and debug your cpp file. If you want to extend the project, adding new file, using external library, you need to update the tasks.json so it will call to your build script or external build system to handle larger project.
But today we shall using CMake(build system generator). It basically generate build directory base our selected build tool and help us to move our project between platform and compiler easily.
Build system: Build automation involves scripting or automating the process of compiling computer source code into binary code. Ex: make, GNU make, nmake, bitbake, ninja
Build system generator: Generator tools do not build directly, but rather generate files to be used by a native build tool. Ex: CMake
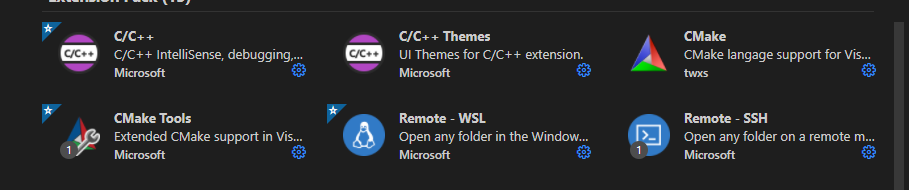
Let’s get the CMake extension, install RemoteSSH/WSL if you want develop on remote machine(Linux) from your windows base environment.
CMake project setup is pretty much the same for both windows and linux, so for the following section, we shall use vscode to setup a project on remote linux.
Let’s switch development environment to Linux from your windows machine
Click here. 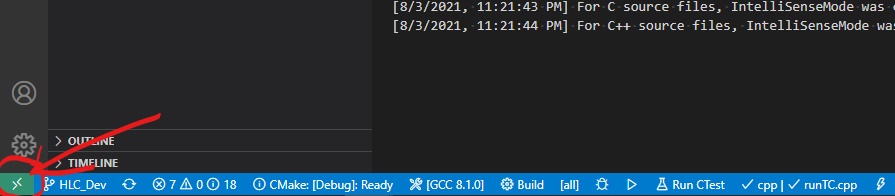 Select your target, could be either WSL on your windows or a remote linux machine with SSH
 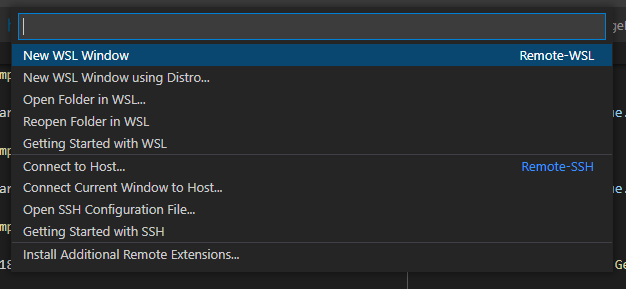 After that, vscode shall connect to your remote machine. Go to extension tab, it will show available extension that you can install on remote machine (it’s the the same as previous section).
[Ctrl + Shift + P]: “cmake”, it will show you available operation with cmake extension. Click on configure, select the compiler and enter your project name. 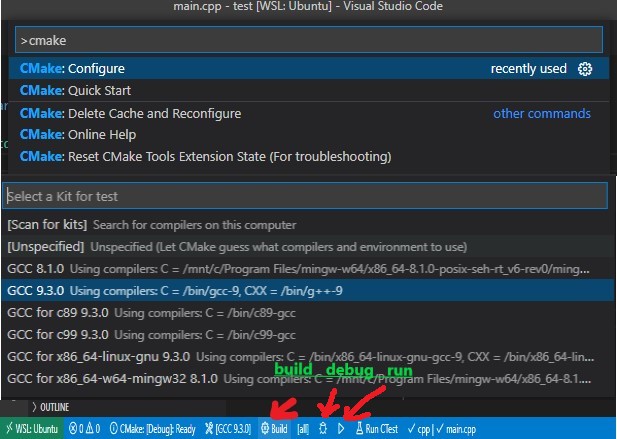 CMake extension request you to create a CMakeLists.txt for your project, and it should be like this.
cmake_minimum_required(VERSION 3.0.0)
project(sample VERSION 0.1.0)

include(CTest)
enable_testing()

add_executable(sample main.cpp)

set(CPACK_PROJECT_NAME ${PROJECT_NAME})
set(CPACK_PROJECT_VERSION ${PROJECT_VERSION})
include(CPack)
In the status bar, you should able to see 3 action: Build, Debug, Lunch. Click on build or F7 and cmake shall create build directory and build your project in it. 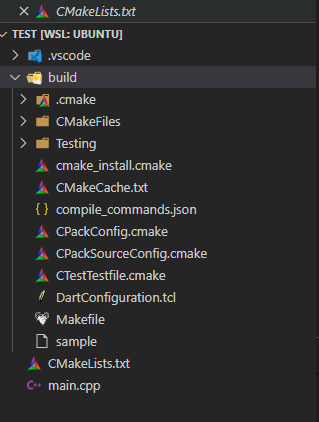 Let’s update the directory: add src and include folder and provide additional code there.
 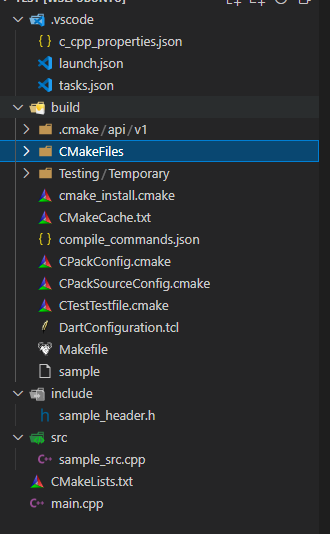 Then update your CMakeLists.txt as following (for more about CMake, please check CMake Documentation)
cmake_minimum_required(VERSION 3.0.0)
project(sample VERSION 0.1.0)
include(CTest)
enable_testing()
set (SRC_FILES main.cpp ${CMAKE_CURRENT_SOURCE_DIR}/src/sample_src.cpp) # your source files
add_executable(sample ${SRC_FILES}) # build executable "sample"
target_include_directories(sample PUBLIC ${CMAKE_CURRENT_SOURCE_DIR}/include) # include directory for header files
set(CPACK_PROJECT_NAME ${PROJECT_NAME})
set(CPACK_PROJECT_VERSION ${PROJECT_VERSION})
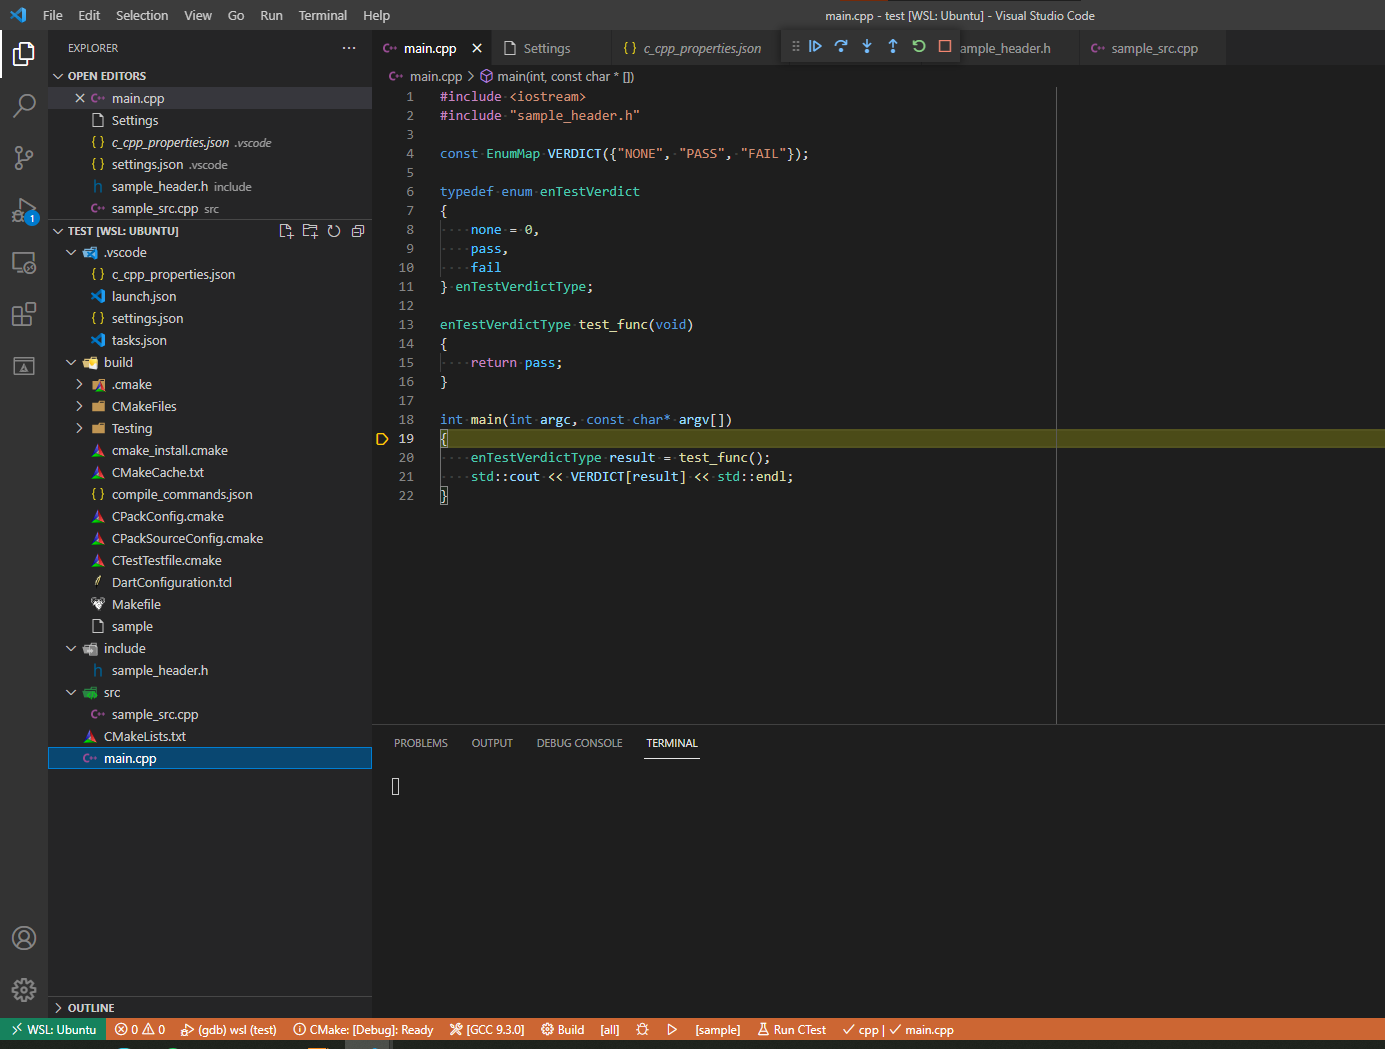
include(CPack)Almost done, let’s update some setting of cmake, so we can push input args to our programs as previous debug session. Create a file settings.json in .vscode folder and input below content.
{
    "cmake.debugConfig":
    {
        "stopAtEntry": true,        # debug stop at entry of main
        "args": ["a", "b", "c"],    # we push 3 input args here
        "MIMode": "gdb",
        "externalConsole": false,
    }
}
OK, now Ctrl + F5, it shall build your project and lunch debug mode.
Nice, now you can update your project, create additional modules, add external libraries, etc. Of course, you have to update the CMakeLists.txt correspondingly with the changes of project. We will have a CMake topic in the near future.
Another thing, VSCode remote extension is pretty convenience when you want to create/build your project in remote machine(raspberry, beaglebone,…). You can just setup a raspberry with ssh enable and it’s good to go. No need for additional keyboard, mouse, monitor or using ssh with CLI.
Remote and debug?
When your program required su to run then normal debug will not work. Here is a workaround.
cd /usr/bin
sudo mv gdb gdb_origin
sudo vim gdb
Input:
#!/bin/sh

sudo gdb_origin $@
sudo chmod 0755 gdb
Now you are able to debug your program as su.